Connecting an electric stove to a 220v outlet is a laborious process that requires the participation of a professional. If it is not possible to contact a specialist, you need to work carefully, observing safety rules and instructions.
Wiring Requirements
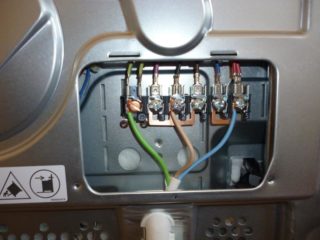
One of the most important operating conditions for an electric cooker when connected is the ability to withstand significant wiring loads.
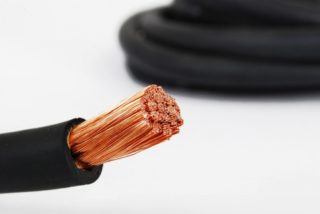
In the living room in which the electric stove is installed, it is necessary to have copper stranded wiring, the cross section of which will be at least 4 mm2. Moreover, if the oven power is higher than usual (reaches 2000 watts), the wire cross-section should be from 6 mm2. Experts recommend laying separate wiring for powering so that the house does not suffer from overload of electricity.
The switchboard circuit breaker must withstand the load of the electric stove. The wiring should, in its possible power, exceed at least one rating required by the device. The best solution is to install an additional distribution panel that will power the furnace. For example, if the stove consumes a current of 20 A, the power of the machine should be 25 A.
It will not be superfluous to install additional protective equipment. These include trip devices, differential machines.
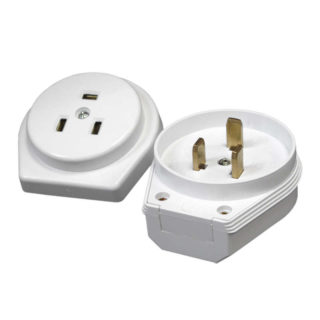
The plug with the socket needs to be placed power. So they can work with heavy loads.
Grounding is carried out to the shield. For high power devices, use a terminal block.
Security measures
To connect the electric stove, you must follow certain safety measures during operation. Socket with plug, wiring or terminal block are matched to each other. The current required for the plate should not exceed the possible for the shield.
The most important safety measure is the selection of the wiring cable, the cross section of which will be large enough to transmit current.
Protective equipment must be used.
The current strength of the residual current circuit breaker, like that of the stove, must not exceed the rating of the shield.
When connecting the parts, make sure that they are all connected securely. There should be no loose loose bolts or screws. This is unacceptable when connecting an electric stove. You need to make sure that the RCD, the wiring socket and the machine are correctly connected.
Electric cooker connection schemes
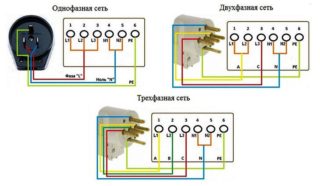 Connecting an electric stove is possible in different ways. Each of the schemes is designed for a specific case.
Single phase connection
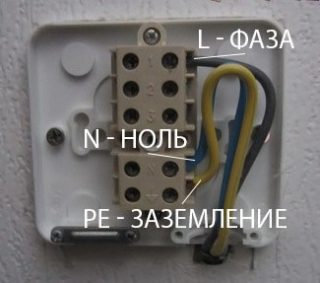
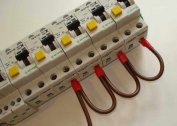
In apartments of multi-storey buildings, this type of connecting the stove to the outlet is most often found. Terminals 1-5 must be connected with jumpers made of copper, the cross section of which is 6 mm2. Usually, when buying new models, jumpers are already included. A phase conductor is connected to terminal number 1, 2 or 3. At 4 or 5, a zero core is connected. After that, the ground wire is connected to a value of 6.
Each bolt is fully tightened. If parts are loose, there may be a fire.
Two-phase connection
The connection diagram of the oven in a two-phase electric stove is rare. It can have two phases - A and C, and phase B will be absent.
In this situation, it is necessary to connect terminals 1 and 2 with a jumper. Phase A is connected through the jumper. Phase C goes to the third terminal. After that, the connection procedure is exactly the same as in the single-phase circuit.
Three phase connection
Three-phase power supply is most often connected in private homes.The wire consists of 4-5 cores. The voltage between the phases in this case is 380 volts, and between zero and phases - 220 volts.
In a three-phase connection, the algorithm is as follows: the corresponding phases A-C go to terminals 1-3, then terminals 4-6 are connected according to the single-phase connection algorithm.
Connection type
Before installation, determine the desired type of connection. Depending on where the connection of the electric stoves occurs, choose one of the following options:
- direct connection.
- using the terminal box.
- through the outlet.
Each of them has its own distinctive features.
Direct inclusion
The direct connection option is suitable when you do not need to disconnect the stove from the shared network. This is the safest way. With it, the risk of overheating is minimized, as there are no additional connections.
If you need a separate disconnect, you need to install a socket or terminal box.
How to install a terminal box
The terminal box is needed when connecting a modern stove to the network without plugging it into an outlet. In this case, a block is used in the mounting box, mounted on the wall from the outside, or a metal box for hidden installation. It is set, observing a distance of 2 meters from the electric stove. However, the height should not exceed 0.6 meters from the floor.
At installation it is necessary to disconnect the electric power. The following follows the pattern:
- A simple pencil mark the mounting location.
- The box is mounted on a concrete wall using dowels.
- The ends of the seals are cut off so that wires can then be inserted.
- Wiring: zero to zero, phase to phase, and ground to ground.
- The joints are insulated with PVC insulation.
Connecting without an outlet is not much different from this method.
Power on
This is a common option for connecting to the network, here the use of grounding is mandatory. You can use a three-phase outlet.
First you need to connect the wire to the machine. After that, the phase and neutral wires are connected. Further, the earth joins the grounding of the apartment or house. A wire is drawn to the installation site of the outlet. It is necessary to carefully connect the wires so as not to confuse.
The socket is mounted on the wall away from metal structures, and the power cable is connected to the plate with the plug.
How to connect an electric stove to a 220 V network
To connect to a 220 volt network, you need to use three-pin power sockets, a three-core cable, a plug with a rated current that is more than 32 amperes.
The cable is first connected to the stove. It is most reliable to pre-compress the conductors with contact plates.
After the actions have been taken, the plug is connected to the cable. It is necessary to unscrew the fixing screws (there are two of them), and then remove the cover together with the contacts. The locking bar is also removed.
The protective insulation is removed from the edge of the flexible cable (5-6 cm), and the conductors are straightened. Then the ends are cleaned from insulation (up to 2 cm). After cutting, the cable is inserted into the plug body.
To determine the phase in the outlet, take a voltage indicator. Install in the place where the intended phase is located, and look at the LED. If it caught fire, then there is tension, therefore, this is a phase.
