For a private home, the availability of autonomous communications is important. Sewerage is here in the first place. Given that sanitary standards prohibit the discharge of sewage into the soil, you should make a sealed cesspool without pumping yourself - a full-fledged septic tank. The percentage of clarification of dirty water in it is up to 85%. This means that the environment will not be harmed.
Types of cesspools and device
For the final discharge of fecal matter and domestic wastewater, craftsmen often mount such cesspools:
- Leaky, with an earthen or drainage bottom. The principle of operation of such a receiver is that all drains through the sewer pipe from the house fall into the pit. Here, partial removal of water into the soil occurs. Dense impurities remain in the receiver as sludge. Later, the reservoir is densely overgrown with such fecal-fat crust and requires thorough cleaning. Water flowing into the ground from a similar reservoir seriously poisons the soil and groundwater. Leaky receivers are often arranged from improvised means - car tires, tires. Such a solution does not save the environment.
- Sealed pit. They dig a well in the ground and completely lay it out with bricks, reinforced concrete rings, or fill it with mortar. The tank has concrete walls and a bottom. The drains enter here and then are removed using a sewer machine. Often owners use special bacteria to slightly reduce the amount of dirty water and the number of required pumpings per year.
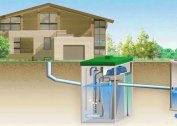
- Septic tank - a full-fledged local do-it-yourself treatment plant. For such a cesspool made of concrete or plastic, 2-3 chambers are characteristic. Each of them performs a separate function. In the first receiver, sediment settles and large debris is separated from the water. Fractions either rise up or settle to the bottom. The initially clarified liquid is poured into the second tank. Here the same principle occurs, only the drains are already freed from smaller impurities. The clarified water goes into the third chamber with a drainage bottom. From here, 85% purified fluid seeps into the ground.
On sale there are aerotanks that run on electricity and clean drains by 98%. Such water can later be used for domestic purposes (watering, car washing, etc.).
Choosing a place for a cesspool
According to SNiP, a pit with a tight or non-tight bottom should be located in a certain place of the site. The requirements are as follows:
- To locate the receiver, select the lowest allotment point. This will allow you to arrange the collector pipes with the desired slope so that the drains can gravity go to the tank.
- The pit is separated from residential buildings at a distance of at least 5 m.
- The source (well, well) must be adjacent to the reservoir for fecal effluents at a distance of 20 meters or more.
- You must remove the camera by at least 3 meters from the neighbor’s fence.
The pit should be positioned in such a way that, if necessary, a sewage machine could drive up to it. Sooner or later, the accumulated sludge will have to be removed from the receiver.
Carrying out the necessary calculations
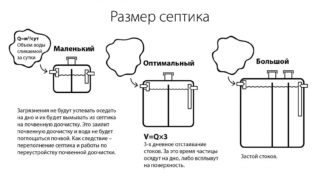
 Before digging a cesspool and making airtight walls / bottom, you should find out the volume of the receiver and its dimensions (width / length / height). Sanitary norms prescribe that for each member of the family an average of about 200 liters of water per day. If we take the average recommended values, for a family of 3-4 people you need a pit with a volume of 3-4.5 m3. It is advisable to make a margin of 30% for a possible salvo discharge.
The depth of the tank directly depends on the groundwater level on the site. The higher it is, the smaller and wider the pit will be. Do not forget about 30 cm in depth on a sand bed under the concrete bottom of the receiver.
If you decide to lay the walls of the tank with a brick, you must calculate the number of blocks. To do this, divide the height of the receiver by the height of one brick and get the number of rows that will be laid out on one side of the tank. We multiply the value by 4 (four walls). We do the same operation with the width of the sides of the pit. Each of them is divided by the width of the block. Thus, we get the number of bricks in one row. It remains to multiply the obtained value for each side of the pit by the number of its estimated rows from floor to top.
Material selection
You can make an isolated cesspool from a concrete mortar, pouring it into the formwork, or from brick blocks. Sometimes the receiver is mounted polymer barrels, but this option is more suitable for summer cottages. Each master chooses a method that is more beneficial and convenient for him.
A pit of blocks is no less tight than a monolithic tank. However, over time, brickwork may burst under the pressure of heaving soil. Therefore, if these are the soils on the site, it is better to fill in the reinforced concrete structure.
When installing a pit of reinforced concrete rings, you will have to hire special equipment. The depth of such a receiver must be fair enough to withstand the required volume.
Installation Steps
To arrange a sealed receiver with your own hands without pumping, you need to prepare a foundation pit for it. Earthwork is best done in late summer or early fall, when the earth is as dry as possible. According to the established marking (in accordance with the scheme), remove the top layer of fertile soil and remove it to the side. Subsequently, the soil can be used in the garden. If you do not have the strength or time to work with your hands, you can hire a bucket excavator. Maneuverable models quickly cope with the task.
If the construction of a septic tank is provided, a pit is excavated next to the second and third chambers. The total output volume of the receivers is divided in such proportions as 50: 35: 15% (1: 2: 3 pits).
- To properly fill the sewer pit with your own hands, you should carefully ram the bottom of the pit, pour a layer of wet sand. It is also well compacted. A layer of roofing material for waterproofing and then a reinforced mesh are laid on top.
- A concrete mixture is prepared in such ratios 1: 3: 5 (cement: sand: crushed stone). All diluted with water to medium density.
- Along the perimeter of the bottom, formwork boards are mounted. It is poured with a cement mixture to a height of 15-20 cm. Allow the bottom to dry completely.
- As soon as the bottom of the pit is ready, formwork boards are installed around the perimeter. The walls are reinforced with metal rods and concrete is poured. In this case, it is important to work it out well with a metal rod in order to expel air, otherwise the walls may turn out to be porous.
- The prepared pit is well dried, but not in the open sun. It is advisable to shade this zone and periodically wet the solution so that it does not go cracked.
- Once the walls are ready, they can be coated on the outside with bitumen mastic and only then can the backfill of the chamber be carried out.
The brick pit also has a concrete bottom. Ready masonry can be plastered from the inside with cement mortar.
Common mistakes
Often when making a sealed chamber under drains, masters make the following mistakes:
- Wrong place under the tank. If it is located at a high point in the site, you will have to make a pressure sewer.
- Incorrect pit volumes. Too small threatens with emergency situations. A large chamber leads to stagnation of drains (if we are talking about a septic tank).
- Incorrectly drawn collector path. It is forbidden to make pipe turns 90 degrees. If you can’t do without it, it is better to use special adapters of 35-45% or differential wells.
- Errors in the installation of overflow pipes (for septic tank). Each inlet tube should be located above the outlet. Otherwise, backflow of sewage will occur. The overflow pipe should always be slightly inclined towards the receiving chamber. The first inlet drain tube is always mounted in the upper quarter of the pit.
When taking into account possible errors, the master can independently build a full-fledged sealed sewer pit or septic tank.


