For high-quality operation of the radiator, you need to choose the right brackets. There are many fasteners. They all differ in type of construction, installation method, as well as functionality. Some are made specifically for a specific design.
Types of battery mounts
Designs for fixing the heating sections are usually divided into two types. Each of them performs its function and is used in individual conditions.
Wall mounts for heating radiators are considered reliable enough, subject to the normal strength of the partition. The list of such clamps includes:
- Anchor brackets. They are long and short, depending on what size and weight you want to install a heater.
- Special elements with the ability to adjust the height of the battery. The design provides for a special plate and a movable mechanism.
- Holders with anti-noise. The standard appearance design has rubberized parts. With the help of them, noise and vibration emanating from radiators and walls are absorbed.
- Corner fasteners. These are small metal structures designed for fastening small-sized batteries with a low mass index.
Floor brackets for heating radiators are used in individual cases. For example, if there is no way to fix the battery on the wall due to the structural features of the room. Among these details are:
- Coasters with a sole. They are designed for heavy radiators, screwed directly to the floor with long dowels.
- Additional floor mounts that are used in case wall mounts are not enough to hold the battery.
- Racks with and without regulator. Their design provides hooks that are fixed not only to the floor, but also to the wall.
- Details in the form of an ordinary stand with a wide sole. They are not fixed on the floor. Used for small heaters.
- Holders on a tripod. Convenient floor bracket with stability. This is often used if the radiator needs to be installed far from the partition.
Floor constructions are also used if the room has panoramic windows or walls are made of drywall. Such elements are not able to withstand radiators.
Marking the installation site
Before you purchase a holder for radiators, you need to decide on the method that will be used for fixing. After that, they begin to markup, taking into account the requirements from SNiP.
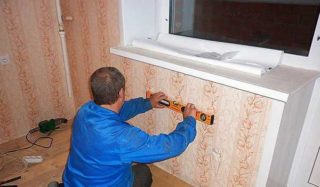
- When installing a wall-mounted radiator, it should be borne in mind that its center should be located in the center of the windowsill. Permissible error - no more than 20 mm.
- It is recommended to purchase radiators, the dimensions of which will correspond to 75% of the length of the windowsill.
- The distance from the floor to the bottom of the battery must be at least 60 mm. This is important to consider when marking before installing the bracket.
- Be sure to have a gap between the wall and the radiator. Estimated distance 30-50 mm.
- The gap from the windowsill to the radiator must be left at least 50 mm.
- The number of fasteners should be selected depending on the number of sections. For example, for 8 pieces, it is enough to place two brackets in the upper part and one from the bottom. The type of mount can be any.
When installing a floor radiator battery, markings are made on a finishing or rough coating. To place the battery in six sections, two brackets are required. The larger the number of sections, the more fasteners.
After considering all the standards for placement, they begin to draw auxiliary lines.
- Having chosen the middle of the window, draw a vertical line from the windowsill to the floor.
- In the presence of a lower wiring, perform a horizontal line, the upper edge of the battery will pass along it.
- If there is an additional side wiring, make another horizontal line, which will become the boundary of the lower part of the radiator.
Focusing on these lines, brackets are installed. The distance between the lower and upper should be at least 300 mm. The gap from the wall to the seat is 80 mm. As a result, the attached battery on the holder should occupy no more than 130 mm of indentation from the edge of the window sill.
Any wall mounted radiator battery can be mounted on floor holders. At the same time, the height from the floor to the middle of the heating equipment should be 140-190 mm.
How to hang a radiator on a bracket
Mounting methods for radiators vary depending on the type of battery selected. Each option has its own step-by-step instruction.
Often cast iron radiators installed under the window. This makes it possible to achieve proper air circulation throughout the room.
- First of all, they are determined with the points where the fasteners should be installed. The bracket for the cast-iron radiator should be located exactly in the place where the sections of the cast-iron radiator are connected to each other.
- The bracket for cast iron batteries is fixed 2-3 mm above the center of the cross section of the heating inlet pipe to the battery. All fasteners are installed in the same way.
- The lower holders are installed using the same technology.
- In order for the brackets to have tight grip with the wall, it is necessary to pre-drill a hole of the desired length with a diameter of 1-1.5 mm less than the diameter of the thread of the fastener.
- The dowels are inserted into the prepared holes, into which the threaded brackets are subsequently screwed.
- After making sure the reliability of the installed elements, carry out the hanging of a cast-iron radiator. After it sits securely in the grooves, you can begin to solder communications for heating.
Steel batteries mounted on wall and floor brackets. Such work is being carried out in stages.
- Holes are prepared and screws are screwed into them. The gap between the cap and the wall should be 3-5 mm.
- Then the brackets are hung on the wall, after which the screws are screwed in until they stop.
- The radiator is mounted on the wall mounts.
- A floor lock is fitted and fitted to the battery.
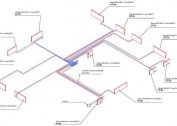
After the installation of the battery, pipes and additional radiator elements are soldered - thermostats, regulators.
In private homes, steel heating radiators are usually installed on metal long brackets. They are designed immediately for lower and upper fixation. Mounted on the wall with self-tapping screws.
At aluminum batteries There is a special holder directly on the case. Brackets are often included. To hang the heating battery on the wall, you must:
- Measure the center of the window and align it with the axial part of the heater.
- Draw borders with a simple pencil on the wall in accordance with the dimensions of the structure.
- To step back two sections from the edges of the battery, mark the distance taken and transfer it to the wall from the drawn border of the radiator.
- Drill holes in designated places, then fix the brackets in them.
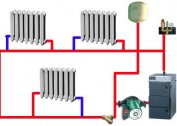
- After that, the batteries are hung up and connected to the common heating system.
Before installation bimetal radiator brackets must be installed on the wall that will support the weight of the heating structure. It is important to be guided by the following rules.
- The distance from the radiator to the wall should be at least 50 mm.
- The design is hung with a slight slope forward, respectively, and the mounts are installed in a similar way.
- The plugs should be exactly at the same level as the system pipes.
The bias is done so that air pollution does not occur in bimetallic radiators. In this case, the installation principle remains the same as for other batteries.
How many brackets are needed
The number of fasteners is calculated taking into account the number of sections of the radiator. Typically, the batteries consist of six sections, so you will need two brackets on each side (lower and upper).
When choosing a mount, the weight of the radiator must be taken into account. After hanging, it should not bend or hang in the prepared hole. If the walls do not allow reliable fixing of the heaters, it is better to use the floor mounting option.


