Hoods are an integral part of any kitchen. With its help, unpleasant odors are removed and the air is quickly cleaned. Modern hoods, unlike older devices, are compact in size and can even be mounted in furniture. You can install the built-in device yourself, following the step-by-step instructions.
Features of the built-in hood
In order to increase free space, people buy built-in appliances. A hood for the kitchen can also be installed in furniture and not make changes to the interior of the room.
The design of the suspended hood has the following elements:
- Fan - responsible for the displacement of purified air.
- Charcoal filter - cleans the air masses and eliminates unpleasant odors.
- Metal filter - collects grease, soot and small debris on itself.
- Control display.
- Backlight.
The principle of operation is based on air circulation. The air is sucked in by the fan into the hood, where it passes through a metal filter, getting rid of grease and soot. Then it enters the charcoal filter to remove odors.
The positive qualities of the hood include:
- The device does not stand out due to installation in a hanging cabinet.
- A wide range - models have different sizes that fit any kitchen parameters.
- High work efficiency.
- The high power of the device allows you to clean any kitchen area.
- You can find a silent model.
- Modern devices have additional functionality that facilitates their operation.
The disadvantages include the following factors:
- The hood performance is lower than that of the dome version. For small rooms, this minus is not taken into account, since the volume of cleaned air is low.
- If a recirculation model is used, periodic filter replacement is required. This slightly increases the cost of operation and makes it difficult to care for the device.
- Some models are difficult to mount, especially those installed in the ceiling.
- The price of embedded products is higher. With an increase in the number of functions, it increases.
When choosing a suitable device, you need to check whether the dimensions coincide with the size of the duct into which the hood will be mounted. Measurements should be taken before purchase. Also, the hood should not be much smaller than the stove, otherwise its effectiveness will be reduced. Before installing the hood in the kitchen in the cabinet, you should read the instructions.
Types of devices
All the models on sale can be divided into two groups according to the type of construction.
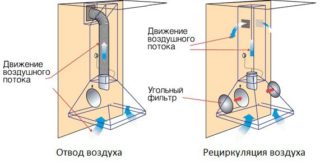
- Circulation (channelless). A device in which the volume of processed air does not change. When installing this hood does not require a tap to the street.
- Flowing (with blower). In such models, polluted air is discharged outside, clean filtered air enters the room.
By location:
- Horizontal devices. These are the most common hoods that are placed in apartments. Installation is carried out in a box that is hung above the stove.
- Vertical. These include hoods, for which you do not need to buy additional furniture for installation. The device is mounted on a wall, which increases the labor cost of work.
Classification by type of embedding:
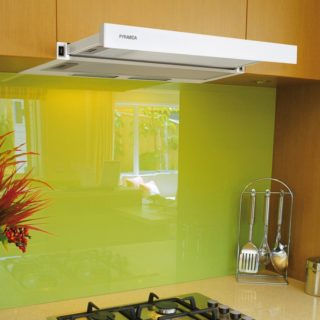
- Into the cupboard.Models are especially relevant for small rooms. Such devices are the most budget. An important advantage is the reduction in noise due to cabinet walls. Installation of hoods built into the cabinet is simple, even a novice master can handle it.
- Wall mounting. It is characterized by increased labor costs due to the need to create holes in the wall. Not suitable for standard apartments.
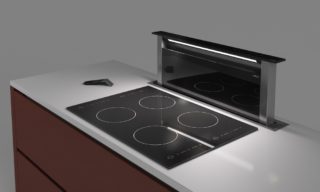
- Built-in countertop. This is a relatively new development in which the appliance body is mounted in a kitchen cabinet. It has a touch panel and LED backlight. They have a rather high cost.
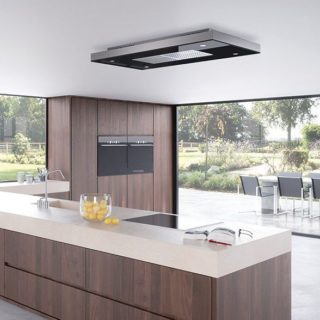
- Recessed to the ceiling. The main advantage of such models is that they do not reduce the height of the ceiling due to the installation of the cabinet above the stove. Install the built-in range hood in the gypsum board ceiling at the repair stage. If the installation will be carried out after finishing work, part of the panels will need to be removed. They have a remote control.
Classification by type of management:
- Electronic. These are the most expensive high quality devices. They have advanced functionality, so before buying you should decide in advance which options will be used. Most of the features of the device may not be used, which makes it worth choosing a more budget model.
- Traditional. They are manually controlled and have a limited set of functions.
Additional options that the hood can be equipped with:
- Removable facade strip. It allows you to hide the device in the closet.
- Various filters that are selected depending on the type of recirculation.
- Automation. It is equipped with expensive models. They make it easier to live in small things - for example, automatic determination of the operating mode, turning on the backlight when a person approaches, turning on after the signs of liquid boiling.
Each hood has a filter. It cleans the air of grease and other contaminants. The grease filter is an essential part of the hood. It happens on the basis of synthetic winterizer (organic), on the basis of non-woven, acrylic, aluminum or steel. Paper filters are practically not installed, as they are disposable. The most reliable are metal products. They need to be changed periodically.
Hood selection
When choosing a device for air purification in the kitchen, you need to pay attention to three criteria:
- The width of the device. The hood should be approximately equal to the surface of the stove. Also, it should easily fit in the box in which it will be installed.
- Power. It is selected according to the recommendations of sanitary standards. The device must draw out at least 10 cubic meters / hour.
- Noise level. It is recommended to take instruments up to 55 dB.
The design of the appliance is not an important indicator, since the hood will be hidden in the furniture. For ease of use, you need to pay attention to the number of built-in lights. Usually enough two lamps on the front of the exhaust device.
Sanitary air exchange rates
All ventilation and air purification systems must comply with accepted sanitary standards. It is necessary to take into account the number of people in the room, the size, the presence of wet and hot surfaces, the amount of contaminated air removed. The combination of these conditions will help in choosing a hood and providing the room with fresh clean air.
For each kitchen room, its own air exchange mode is selected. It depends on the number of hot surfaces, the presence in the room of multicookers, ovens and other appliances. They significantly change the composition of the air and additionally pollute it.
SanPin adopted the optimal way to take into account the air exchange regime - in multiplicity. It is necessary to determine how many times during the day the old air should be replaced with new. The values will vary for a kitchen with different types of stoves. The ventilation mode is calculated by the volume of the hood.
Performance calculation
The performance indicator is the main one when choosing a hood. Calculations are done in the standard way.
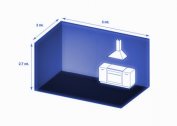
Calculation example for a kitchen of 10 sq.m. and with a ceiling height of 2.7 m. The volume of the kitchen is 10 × 2.7 = 27 cubic meters. For 1 cubic meter, a productivity of 10 cubic meters / hour is required. Then the productivity for the entire room will be 27 × 10 = 270 cubic meters / hour.
It is better to take hoods with a small margin of power. Low productivity will not allow you to effectively remove all contaminated air from the kitchen.
Mounting the built-in hood
After purchasing the hood, you can proceed with its installation. Typically, manufacturers provide a mounting scheme that is easier to work with. First of all, you should choose the installation location. Selection recommendations are given in the joint venture and instructions for the device.
The basic algorithm for any type of built-in hoods:
- Creating a placement plan. You also need to choose a place for the duct.
- Carrying out the necessary measurements if the hood is built into the cabinet.
- According to the data obtained, recesses and holes are created, including for fasteners. If the device needs to be embedded in the wall, a corresponding niche is made.
- Fastening the hood in the box. Previously, it should also be fixed on the wall above the stove.
- Air duct installation.
- System testing. The initial check of the headset's performance is done before installation. At the end, the correct operation of the entire assembled structure and the convenience of its operation are checked.
You also need to consider that usually the cord length for the device is not enough. An additional power outlet may be required.
The air exhaust system should have the most direct path. The channel is made in the form of a corrugated or smooth-walled sleeve. Its diameter depends on the size of the outlet.
Installation Rules
During the installation of the hood, you need to take into account many nuances. There are a number of additional rules besides the manufacturer's instructions that should be observed during installation:
- The retractable part of the device should always be accessible.
- The outlet must connect to a ventilation shaft or wall opening. The option of processing air masses is undesirable.
- The optimal gap between the stove and the hood is 65-75 cm for electric and 70-80 for gas.
- Be sure to put an anti-return valve. He will not let polluted air into the room.
You can create a hood for your own hood. It is necessary to take measurements in advance and focus on them during assembly.
Expert Advice
There are two ways to install the hood in the cabinet: first they put it in the cabinet and hang the fully assembled structure together, or install it in the box already hung on the wall. The selection of a suitable method is made only at the convenience of the wizard. General recommendations:
- It is necessary to foresee a place for the hole for the blower.
- Powerful hoods must be connected through a separate outlet.
- Wall mounting is best done with dowels. If the installation is done in a shelf or wall of the cabinet, you need to take self-tapping screws.
- If you purchased a telescopic model, make sure that the cabinet doors do not interfere with the extension of the working panel. Otherwise, they can be filed.
- Blowing is best done from a metal pipe. Plastic and corrugated elements are easier to install, but they fail more quickly. Also, when air masses pass through a metal surface, practically no noise occurs.
It is important to connect the housing and duct in such a way that users can disassemble and clean the structure if necessary.

